Wednesday, November 18, 2009

Stitching for Carole

Several weeks ago Carole from NZ asked for bloggers to help her by embroidering a small 5" x5" piece of tea dyed fabric which would be included in a quilt.
I said I would love to and so Carole sent me the fabric and the thread to do it.
The reply that Carole received from bloggers world wide was amazing and she has started receiving the little stitcheries back already.
I posted mine off yesterday and I just couldn't wait any longer to show what I did.
Sorry Carole but I told you not to look didn't I.
The first photo shows you a cropped version of what I did.
First I stamped my image on the fabric using a Fabrico ink pad and I started embroidering with 2 strands of the embroidery floss--this is the centre section--but I thought it looked too bulky so I tried one strand which is the stitching on the left and decided to do it all with one strand.
Carole told me I could use other colours as well,which I was going to but then I saw how lovely the one colour looked on some of the others that she had already received I decided not to.


Here is the finished block and I have used Stem stitch-Lazy daisy stitch and French Knots for the embroidery.
I stitched a border around the flowers with two strands of the floss working it in Stem stitch and I also added my initials.


When Carole sent the fabric and threads I was amazed at the envelope which she had decorated.
On the front left hand side was this lovely stamped image---


And on the back was this wonderful stamped verse.


Carole also included an ATC as a thank you gift for doing the stitched piece.
It was my pleasure to do it Carole and I hope that you like it and it fits in well with the others.


By the way if you want to see some of the others that she has received already just follow the link above.

Friday, November 13, 2009

November Calendar Girls postcard

This months calendar page was chosen by Jenny and she selected an Arthur Rackman page called Fairies in Hiding.
I decided this time to concentrate on the title not the picture.


The outer background is made from Silk cocoon strippings which were coloured with Starburst Sprays.
I tore the centre section out and added a fabric picture of a fairy in a garden.
I added more colour to the fairy using Twinkling H2O's which gave the piece some sparkle.
I am sorry but the sparkle is not obvious in the scan but you can trust me it is there.
The machine made cord couched around the fairy is to represent the tree roots.

I hope Pippa likes it.

Monday, November 9, 2009

The Wanderer has Returned

Today the ATC that Ann in the Netherlands sent to me for our October "flowers" swap arrived after a four and a half week journey.
Oh if it could only talk.

Thank you Ann it is beautiful.

Sunday, November 8, 2009

October swaps

The theme for the October swap in the small group that I belong to was Flowers.
I received the top card from Debbi and she has added a lot of different techniques to this one.


This one is from Carole in NZ and she has used a vintage embroidery.


Lastly this one is from Annie in WA and she has used her cuttlebug for the embossed flowers.


My ATC from Ann in the Netherlands has decided to go on a journey to someone elses house instead of coming to me.
Ann is going to send me a replacement.
The next ATC is from Jen in Victoria who I swapped one of my flower pounded ATC's with as well.
Jen commented that she liked the ones that I had done for the swap above so we agreed to do a swap and she had also done a flower pounded background on hers.


This is the flower pounded design that I had made for everyone.


Friday, November 6, 2009

Next Years Calendar

Each year at my local stamping and paper arts store they produce a calendar-well several really.
The idea is that people put their name down to produce a page in a certain theme and they then have to make 12 pages for that month in the theme.
They have to be handed in to the store by October and then the lady in charge constructs the calendar-one page per person for each month and binds them together so that at the Christmas party we are then presented with a calendar each.
Well that how it is supposed to happen anyway.
Last year I participated and the theme was events--I got September and I produced a page depicting Spring-which starts in Oz on the first of September.
Well the poor girls at the store had to make up 3 months of pages because some people did not fulfil their committments and when we received our calendar there was still one blank page because the girls ran out of time to do them.
I decide that this year I would not put my name down to take part but I told the girls if the same thing happened this year they could call on me to make a month if they needed me.
Well last Friday I received the call for help--"When do you need it by" I asked.
"As soon as you possibly can" came the reply.
I decide that I would take all the stuff down the coast with me when we went earlier this week and get a start on it.
I handed the finished pages in this morning and was told they were still waiting for some of the others.
I can't understand the mentality of some people not to fulfil their obligations--they not only let down the rest of the contributors but put a lot of pressure on the girls at the store to make up the rest.
That's 12 pages for each month that has not been handed in.
I will do more if they need me to.
Anyway here is the finished page--on white card stock because nothing else looked any good.
The theme was Seasons and my month was October and guess what?
October in Oz is still spring.
I didn't want to do spring again so I decide to do all the seasons on one page.
Each block consists of a black background and another piece of card on top of it.
Then I added the embellishment to depict that season.


Here is Summer and Autumn.
Summer has sand stuck on with Mod Podge and a small shell was added plus a pair of thongs stamped on purple card-cut out-and attached with mounting tape.
I added some bling on the thongs and coloured the straps in with a silver pen.
Autumn has punched out leaves that were attached with double sided tape or mounting tape.
The titles were printed on the same card and attached above each month.
The calender month was printed onto white card stock on the computer-I then smudged some blue ink around the edges and mounted it onto black card as well.


Winter has a black background with a light grey card stock added onto this.
Then I stamped a snowflake onto silver glossy card using white Stazon ink and attached it with a white brad.
The title was stamped onto the silver card with black Stazon ink.
Spring has a mauve card on the black background with a stamped image of flowers on white card added plus a butterfly made from two punched out butterflies joined on top of each other with a bit of bling added and glued on with glue dots.


I am very pleased with how this all turned out--there was a lot of bits to cut out and mount to make each block but I did it.
And all I can say to those people who didn't do theirs is "if I can do this in a week then you should be able to do something in nine months.
Go figure.

Thursday, November 5, 2009

Second Book

This is the second book that I am making as part of the online workshops with Maggie- Lynda and Carol.
In the last post I showed the Doodle book that Lynda showed us how to make and this one is from Maggies instructions.
This is the open book showing the back and front covers.
I didn't use the copper foil on the back cover because I wanted to have one cover with the copper base and one without.


Here is the front with the copper foil scrunched up and glued to the cover.


Tissue paper was added and then sprayed with Starburst sprays.


Now I have to make the spine.


Thursday, October 29, 2009

The Book

I am doing the free online workshops that came as part of the deal when I purchased both Lynda and Carol's book "Stitching the Textured Surface" and Maggie Greys book "Stitches Straps and Layers".
Lynda had the first workshop and she gave instructions on how to make what she has called a "Doodle book".
It is made from baby wipes and paper and card.
This is my finished book.
The cover--------------


Standing up---------------


and laying out flat-----


An artsy view of the open book


And some of the signatures----------


and more-----------


the last one.


I am quite pleased with this and the fact that I finished it is a plus also because I usually get all the info and do all the samples and then I don't go through to the end.
Now to start on Maggies lesson.

Sunday, October 25, 2009

Fiber Fever October swap

Finally my page has arrived at it's destination so I can show you what I did.
My swap partner was Wilma and her theme is "Thinking of France".
There were a lot of things that I could have done but whenever I think of France I think of Paris fashions.
I have a wonderful piece of fabric that has ladies dressed in very fashionable clothes so I cut one of these out to use.
The background is silk fabric with a piece of gold mesh over it and then the lady was appliqued onto this.
I stitched the words Paris Fashions on my Bernina and added this to the page.
I finished up doing a zig zag edge in purple thread to finish it off.


I know that Wilma likes it and I was very happy to make it for her.

Thursday, October 22, 2009

October Fiber Fever

Here is the page that I received from Lise for the October swap in the Fiber-Fever group.
It is hard to get a really good photo of it but the colour is wonderful.
It is made from different shades of grey fabrics and also black.
Their are many butterflies on it and 2 dragonflies as well and their wings lift up.
This is Lise's first attempt at crazy quilting and I think she has done a magnificent job.


This is the back of the quilt----just as beautiful.
I will show you the page I made for Wilma as soon as she receives it.


Thanks Lise--I love it.

Saturday, October 17, 2009

Flowers ATC's

In the small ATC swaps group that I belong to the theme for this month was Debbi's and she chose flowers.
I decided that seeing as I have been experimenting with flower pounding I would use it as part of my cards.
Here are the four cards that I will be sending off to the other ladies.


I got a bunch of flowers at the supermarket and in it were some maroon coloured bell shaped flowers and I haven't a clue what they are called.
I know that I should have taken a photo of them to show you but when I remembered it was a bit late after I had pounder them past any recognition.
This is how the flower looked after pounding.
It has a lovely watercolour painted appearance to it.


I then decided to use a Hero Arts stamp that I had and I overstamped it onto the background using Dirtress inks.


I am very pleased with the outcome of these and I hope the ladies who will be receiving them will be as well.

Wednesday, October 14, 2009

More Flower Power

Yesterday we did some flower pounding with the group and I was rather pleased with how this pansy turned out.
This is the front view of the pansy which was facing down onto the page -----


---and here is the back view which because of the callyx did not imprint on the paper as much as the front.
I love the subtle appearance of the back and the strong colours of the front.


Now to try something else--hmmmm

Sunday, October 11, 2009

Flower Power

This week our Paper Arts group at the Guild are exploring flower pounding so I thought I had better do some samples seeing as I was the one demonstrating it.
I have used cheap watercolour paper 280gsm weight that I purchased from the local dollar shop.
I arranged the flowers and grasses between the paper and using a rubber mallet I pounded on the paper so that the colour transferred to the paper.
The flowers are Dandylions from the neighbours lawn and some grasses.
This has a watercolour painted look about it.
I think it would look lovely on fabric and then it could be stitched.


The second one has red Grevillea flowers at the top (they are the purple coloured ones) also some yellow Fuschias and more grasses.


I know you are going to ask about the colour and how long will it last.
All I can tell you is that I did some about nine years ago and the colour is still there.

Friday, October 9, 2009

October Calendar Girls Postcard

This months Calendar was chosen by Carol M and it one by Alphonse Mucha.
I struggled a bit with this one because I am not arty enough to be able to translate the lovely lady or the ugly beast into a postcard so I focused on the circle behind the lady and the leaves in the bottom left hand corner.


I chose a hand dyed green fabric as the background and the circle was stitched on a piece of rusted fabric using four different coloured threads then vliesofixed on to the background .
The leaves were made on the embellisher from felt and scrim.
I attached them by machine and added a paper flower with a yellow button in the centre.
My swap partner is Val and I hope she will like it.


If you want to see what the other girls have done click on the Calendar Girls badge on the side bar.

Thursday, October 8, 2009

I've been having fun

This week I decided that I would make some cards because I always find it so relaxing to make them.
I have so many stamps that it's not funny but I forget to use them when I make cards.
After I have made 6 or 7 cards I think "oh I should have used such and such a stamp".
I own a good selection of stamps with ladies on them and these are the ones that I use the most.
The first one is a stamp made by Stamp-It in Perth WA and it is called At the Opera-Elizabeth.
First I stamp the image onto a piece of card stock and then I stamp it again onto a piece of coloured paper either plain or printed.
Next I cut out the hilite peices that I want to use from the coloured one and then I glue them onto the background one.
I know I can hear you saying "why don't you just colour them in" in the first place.
I just like the look of it this way.
Lastly I add a bit of glitter to make it sparkle.


I don't know who made this stamp--I got it at our local stamping place and it wasn't expensive either.
In this one the umbrella -boots and bag when stamped on the coloured paper turned out a dark brown colour because of the stamp being solid in those sections where-as the coat only had the outlines.
I tarted up the umbrella and bag with glitz.
I added some paper that had Autumn leaves on it to add that windy Autumn feel to the card.


This one is another one that I got from the stamp shop and I don't know who it is from.


This is another one from Stamp-It and is called "Lady at the Races"
I love this stamp and I use it the most.


This is the latest one that I bought-don't you just love those pointy shoes.
I had to cut out all the bits-the gloves and hat and make sure they are done perfectly or else you can see the background stamp when you glue them on.


The last 2 are made using hand made paper-fabric and an artificial flower.


My daughter got me these flowers when she was working in Dubai several years ago.


Now I have to make some male type cards --men have birthdays too don't they.

Tuesday, October 6, 2009

Oops I forgot Something

I received all of the lovely art below last week and forgot to show you--naughty me.
The first one is my August Calendar Girls postcard from Lynda-- it is made from Lutradur-very yummy.


The next three 4 x 4 works of art were sent to me by members of the small group that I belong to (must get them to give us a name).
In September the swap was a vintage 4 x 4 hanging instead of the usual ATC that we swap.
I asked them if they would mind if I didn't take part this time because I was so busy with (you know what) and I just could not make the committment.
Well was I surprised when several parcels turned up unexpectedly and I found that they didn't want to leave me out--how nice is that.
The first one is from Debbi--she does remarkable work and it is always a joy to receive gifts from her.


The second one is from Carole in NZ and it has such a lovely feel to it and is made from vintage fabric and laces.


This last one is from Annie in WA--I love the lady on it she looks so elegant.


Thank you girls for your kind thoughts- it was a wonderful surprise that was much appreciated and cheered me up when I was so worn out.

Monday, October 5, 2009

September Calendar Girls Postcards

At last I have something to show you.
Finally after one week I have recovered from the hectic Guild exhibition and I have created something.
I am very late with my Calendar Girls Postcard but I just didn't have time to do it in September.
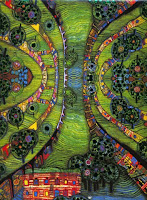
This months page is Pat's choice-----


---and Pat was my swap partner as well.
I chose to focus on the semi circle lines and the trees in the picture.
I used dark green felt as the base and used the embellisher to add 3 different shades of green fleece to it.
I then added some of the fibres pictured below to form the lines and next I added a piece of creamy/green chiffon scarfe and ran this all through the embellisher again.
I found three buttons that to me looked like the trees in the picture-stitched them on and ta-da it's done.
I hope Pat likes it.


The fibres---------


And this is the postcard that I received from Debbi---thanks Debbi I love it.


Now onto the October page which really has me stumped for ideas.